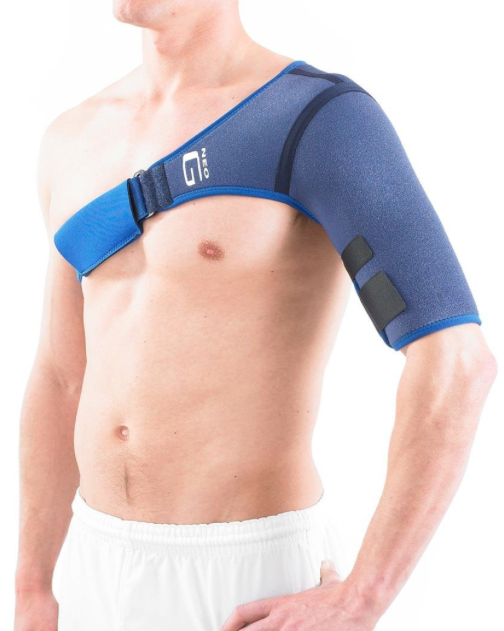
Shoulder support braces are medical devices designed to assist the patient’s shoulder by supporting the muscles and rotator cuff area through load sharing, which starts from the chest area opposite of the injured shoulder. This kind of support posture device typically consists of elastic straps that protect the injured shoulder by wrapping the arm and chest area, thereby leveraging support on the injury throughout the upper body. A shoulder brace is a tool used for preventing future dislocations in the shoulders, too, through excess movement.
Use of Shoulder Braces
When a person suffers shoulder injury due to dislocation or shoulder impingement, a back and shoulder brace can be used for supporting the shoulder socket area, which helps to reduce some discomfort. This support brace securely compresses the shoulder area, providing adequate support.
When the patient strains the shoulder area, the shoulder brace is a beneficial tool for providing rest and support to the injured area, which will allow sufficient time for healing.
However, with the support it possibly provides to injured patients, using posture shoulder braces also has its downsides. A common side effect of injury to the shoulder area is the frozen shoulder syndrome. This happens when an individual injures the shoulder area, and the pain is mitigated by reducing the usage of the shoulder in general.
The frozen shoulder syndrome occurs when scar tissue develops around the injured area, which may require surgery by the attending physician for repair. When a patient is required to wear a shoulder brace through rehabilitation, it is important to continue daily shoulder exercises and not allow the area to become stiff.
The shoulder brace is made as a temporary solution as it attempts to keep the muscle from developing additional strains that aggravate the earlier injury. This should be considered a device to assist in the management of pain as well as support for the shoulder muscle area in general. Typically, shoulder braces and slings are used for less complex injuries that do not require surgical intervention.

Typical Uses Of Shoulder Braces And Slings
Many factors are used to identify whether or not a patient needs to wear braces. In most cases, a shoulder brace is only required for a minimum of few days or a maximum of two weeks. The exact amount of time a patient needs to wear them depends upon the severity of the injury.
-
Support from injury
Support of an injured limb is a vital step and can speed up the recovery process following injury. Some types of braces work to compress swollen joints and aid in the recovery of inflammation. They can also take the support of injured muscles, allowing them to rest and recover faster.
An ideal brace will have a close fit and will be adjustable in several sizes on the right or left sides to achieve a comfortable fit. Some are even custom made to fit the individual to increase the support. However, these types of sling can be very expensive.
-
 Shoulder compression (proprioception)
Compression of the shoulder is done to enhance the receptors in your skin by sending messages to your brain about the position of your shoulder. Studies have shown that people who have suffered from instability in their shoulder, such as a subluxation or a dislocation, have a decreased sense of awareness in their unstable shoulder.
This awareness is termed proprioception and includes knowledge about the position of your arm, the amount of force your muscles are applying, as well as the coordination with other muscles. It is also known that wearing a brace can improve the proprioception in unstable shoulders. This process allows the skin receptors to compensate for the damaged receptors in your shoulder capsule or muscle.
-
Skin protection from physical activity
Protection of the skin from being damaged due to grueling physical activity may also be offered by wearing a shoulder brace. Many of the tendons in the shoulder are quite superficial, and the wearing one can protect the skin and superficial tendons from bumps and knocks.
-
Shoulder conditioning and strengthening
Strengthening of the shoulder is also possible while wearing a shoulder brace. Some types of braces have neoprene straps which offer more resistance as they are harder to stretch. Every time the arm is moved, the muscles have to work harder to resist against the straps.
Wearing a shoulder brace can, therefore, facilitate the strengthening process of the injured shoulder. Offering increased resistance to movement of the limb will also have the effect of slowing down the speed that the arm can move into risky positions.
How To Use A Shoulder Brace Or Sling
The process of how to wear and use shoulder braces varies, depending on the instructions provided by the manufacturer. Always make sure to read the application guide provided when you are required to wear them for immediate shoulder support. Below are the general steps to give all readers quick background information:
Basic application process
- Place the shoulder in the sleeve of the brace. Attach the hook and loop strap snugly just above the elbow.
- Hold the garment in place while the athlete pushes the arm down into the brace to assure good contact between the neoprene and the skin.
- Close the garment using the hook and loop closure under the opposite arm to provide a comfortable but snug fitting.
The next steps depend on the level of injury you have on your shoulder. These are classified according to different types of instability.
Anterior shoulder instability
- Attach the fixed hook and loop end of the bifurcated (split) strap to the brace on the posterior and lateral aspect of the involved arm. Pull the lower strap under the axilla, behind the back and over the opposite shoulder. Cut strap to length and secure with hook and loop closure.
- Put the upper portion of the strap under the axilla, behind the back and around to the front of the body. Cut strap to length and secure with hook and loop closure.
- Check for desired levels of mobility and stability, and adjust straps as needed.
Multi-directional instability
- Attach the fixed hook and loop end of one strap to the medial and posterior aspect of the involved arm. Pull the strap superiorly just distal to the acromion process. Bring the strap across the chest then around to the back. Cut strap to length and secure with hook and loop closure.
- Check for desired levels of mobility and stability and adjust straps as needed.
Inferior instability
- Attach the fixed hook and loop end of one strap to the medial and posterior aspect of the arm. Wrap the strap around to the front of the arm, then under the axilla. Bring the strap across the chest then around to the back. Cut strap to length and secure with hook and loop closure.
- Attach the fixed hook and loop end of the second strap to the medial and anterior aspect of the arm. Spiral the strap around to the back of the arm, then under the axilla. Pull the strap up and over the acromioclavicular joint. Bring the strap across the back then around to the front of the body. Cut the strap to length and secure with hook and loop closure.
- Check for desired levels of mobility and stability and adjust straps as needed.
Posterior instability
- Attach the fixed hook and loop end of one strap to the lateral and anterior aspect of the arm. Pull the strap down under the axilla, then over the posterior and superior aspects of the humeral head. Bring the strap across the chest, then around to the back. Cut the strap to length and secure the hook and loop closure.
- Check for desired levels of mobility and stability and adjust straps as needed.
Rotator cuff deceleration
- Position the arm in an externally rotated position. Attach the fixed hook and loop end of the strap to the posterior aspect of the athlete’s arm. Pull the strap up and over the acromioclavicular joint, the fancy name for the joint at the top of your shoulders. Bring the strap across the back, then wrap around to the front of the body. Cut strap to length and secure with hook and loop closure.
- Check for desired levels of mobility and stability and adjust straps as needed.
Muscle strains
- Attach the fixed hook and loop end of one strap to the medial and posterior aspect of the involved arm. Pull the strap superiorly just distal to the acromion process. Bring the strap across the chest then around to the back. Cut strap to length and secure hook and loop closure.
- Check for desired levels of mobility and stability. Adjust straps as needed.
Treatments for shoulder injuries range from therapy to surgery, depending on the complexity. Before selecting a treatment, make sure to first determine the cause of the problem.
This can be done by seeking medical advice, which will include a medical exam and in some cases require a magnetic resonance imaging (MRI) test, to determine the underlying problem within the shoulder ligaments. A visit to the doctor will get you started on the road to recovery, finally getting your shoulders to function 100%.
